1.Getting started
Create an account on the Sign Up tab at ommini.com/en/login.html, then click the verification link sent to your email. The free plan's multi-scene video and music allowance becomes available once your email is verified.
The panel
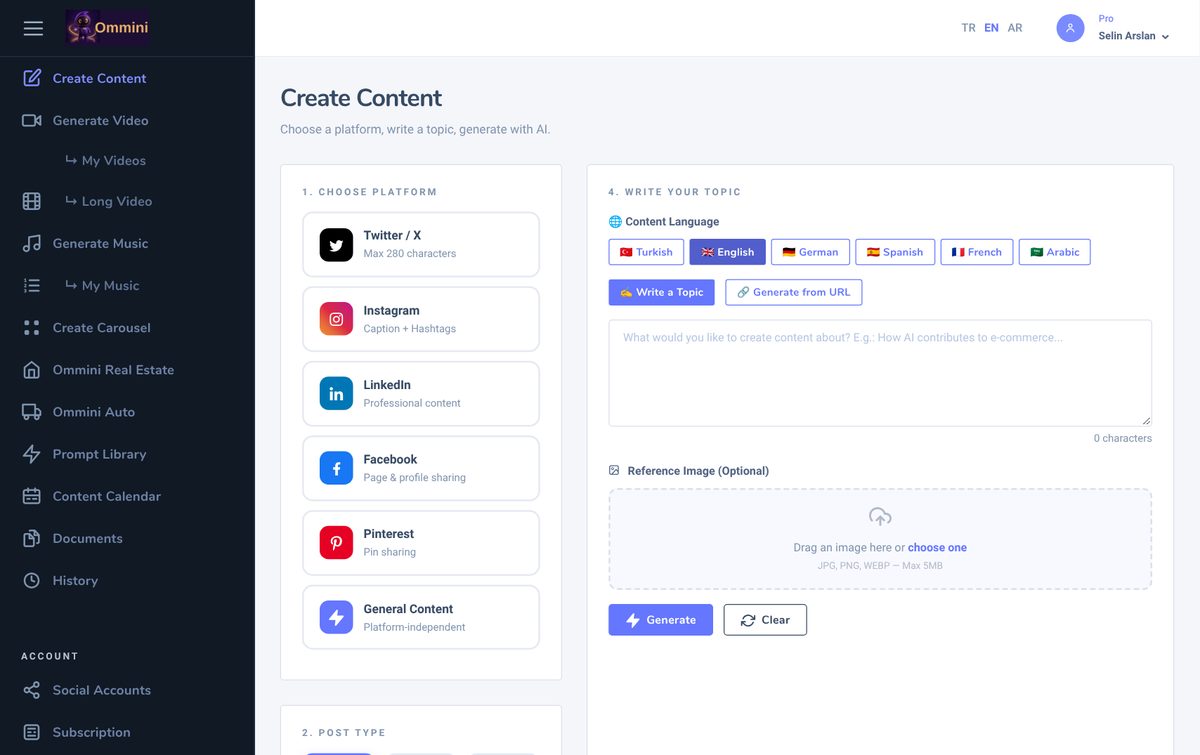
The left menu holds the creation tools (Create Content, Generate Video, Long Video, Generate Music, Create Carousel), the Prompt Library, the Content Calendar, Documents and History. Under Account you will find Social Accounts, Subscription, Settings and Help. The TR · EN · AR selector at the top right only changes the language of the screens.
2.Settings
The Settings page, near the bottom of the left menu, has four tabs: Profile, Password, Social Accounts and API Keys.
Profile
The fields on the Profile tab:
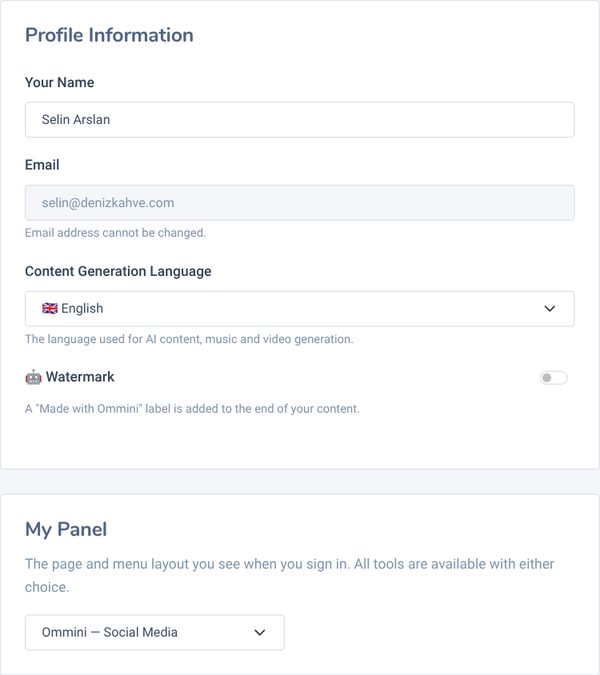
- Your Name: The name shown at the top right of the panel. The Email address cannot be changed.
- Content Generation Language: The language the AI writes in (Turkish, English, German, Spanish, French, Arabic). The language buttons on the content and video pages change this setting too, so you can use the screens in Arabic and still create English content.
- Watermark: When it is on, the line "🤖 Ommini ile üretildi • ommini.com" is added to the end of your texts. It is required on the Free plan; on Pro and Business you can turn it off.
- My Panel: The panel that opens when you log in. Ommini — Social Media opens the tools in this guide; Ommini Real Estate and Ommini Auto are listing panels. Whatever you choose, every tool stays in the menu.
Changes take effect when you press Save at the bottom of the card.
Password, Social Accounts and API Keys
On the Password tab, enter your Current Password and your New Password twice (at least 6 characters), then press Update Password. The Social Accounts tab takes you to the page where you connect accounts (section 4). The API Keys tab is for automation tools (section 14).
3.Plans, allowances and credits
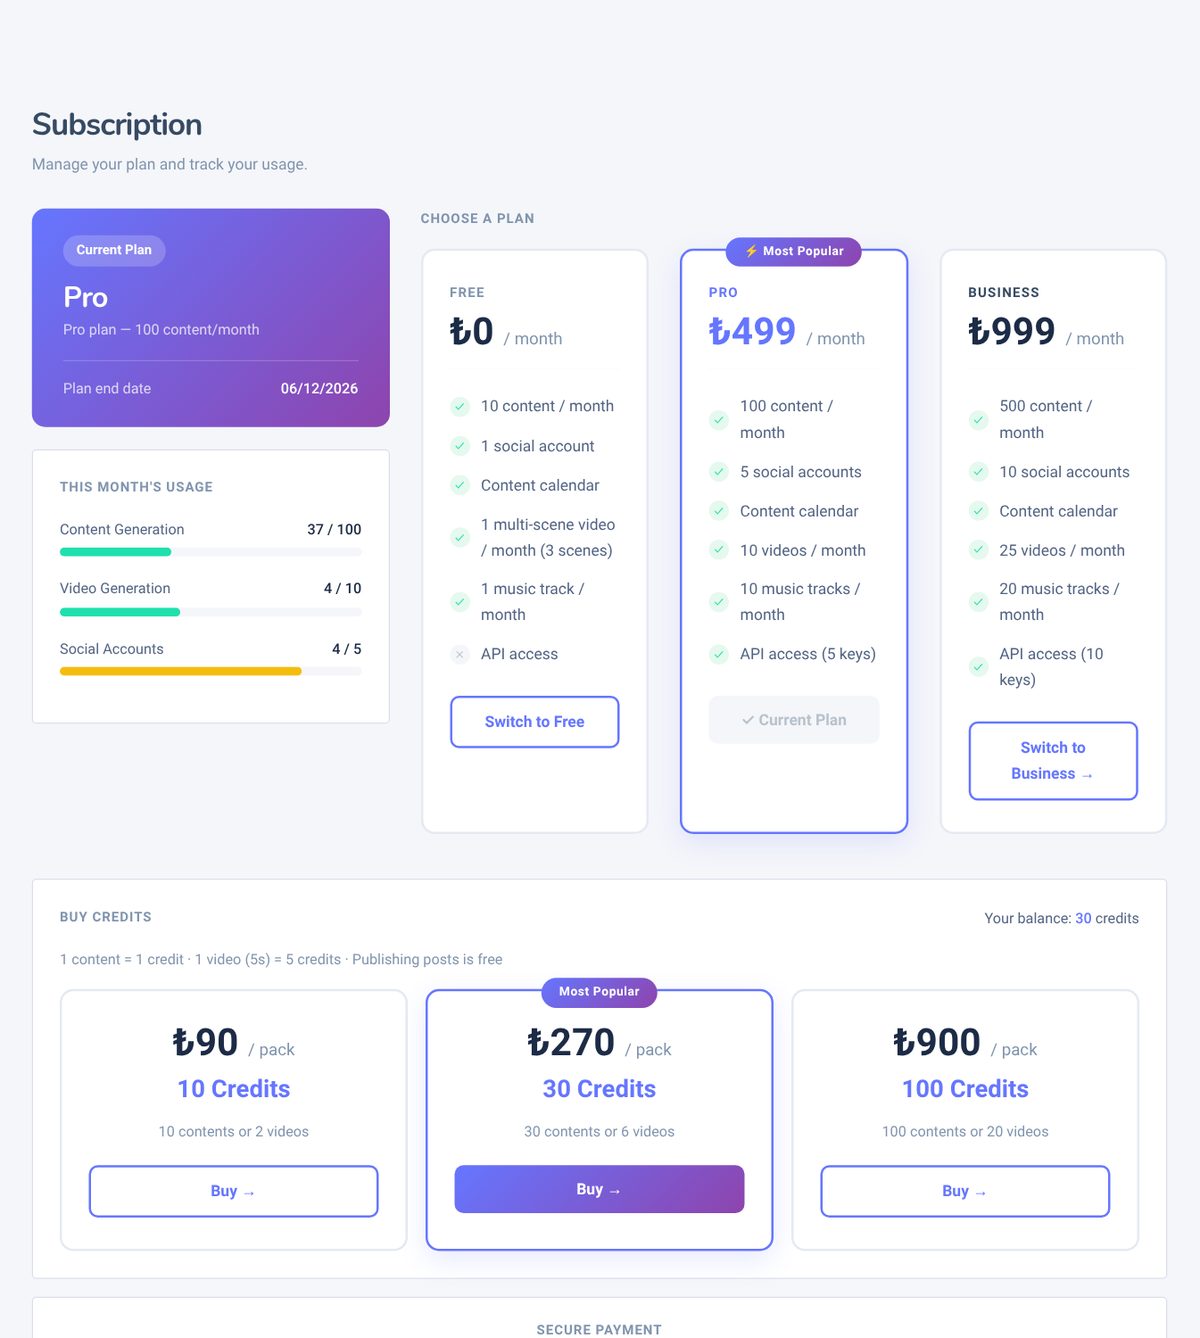
Each plan comes with monthly allowances. When an allowance runs out, creation continues from the credits you have bought. Monthly allowances renew at the start of each month and do not carry over; credits stay until you use them.
| Monthly | Free | Pro | Business |
|---|---|---|---|
| Content (text, image, carousel slide, long video scene) | 10 | 100 | 500 |
| Video allowance | None; 1 free multi-scene video a month (3 scenes × 5 s) | 10 | 25 |
| Music | 1 | 10 | 20 |
| Connected social accounts | 1 | 5 | 10 |
| API keys | None | 5 | 10 |
How allowances and credits are spent
The monthly allowance is used first; credits are used once it runs out. The estimated credits shown on the pages follow this rule.
| One text, image or set of AI lyrics | 1 content allowance or 1 credit |
| Carousel | 1 content allowance or 1 credit per slide |
| A 5-second video or scene | 1 video allowance or 5 credits (10 seconds: 2 allowances or 10 credits) |
| Long video | 1 content allowance or 1 credit per scene; plus 2 video allowances or 10 credits per moving scene |
| Music | 1 monthly music allowance (deleting a track does not give it back) |
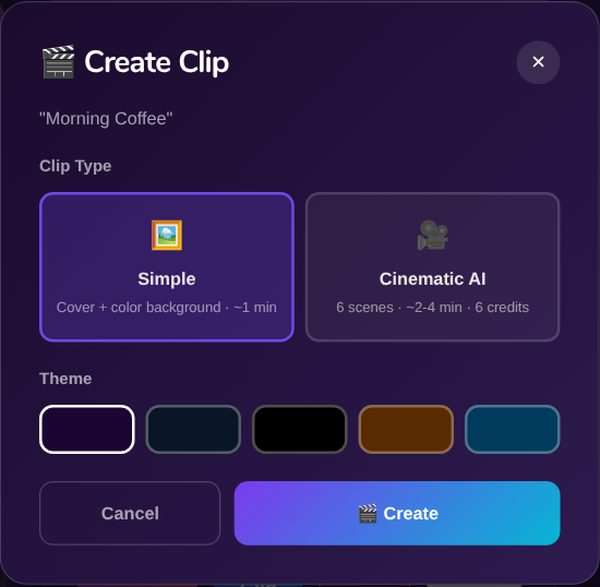
| Music clip | 1 video allowance or 5 credits per clip; a Cinematic AI clip uses 6 video allowances or 30 credits |
| Scene image (From photo) | 2 credits |
| Publishing and scheduling posts | Free |
Buying a plan or credits
The Subscription page shows your current plan, its end date and this month's usage. When you choose a plan or a credit pack and enter your card details, payment is taken through iyzico with 3D Secure. A plan bought on the web is valid for 30 days and does not renew by itself; when it ends, the account returns to the Free plan. A subscription bought in the mobile app renews through the App Store or Google Play and is cancelled there. Current prices are on the Subscription page.
4.Connecting social accounts
To publish from Ommini, you connect each account once:
- Open the Social Accounts page from the left menu.
- Press Connect next to the platform.
- The page that opens is the platform's own login screen; log in to that platform with your own username and password. Ommini never sees or stores your password.
- On the permission screen, choose Allow (or Authorize). You return to Ommini and the account shows as Connected.
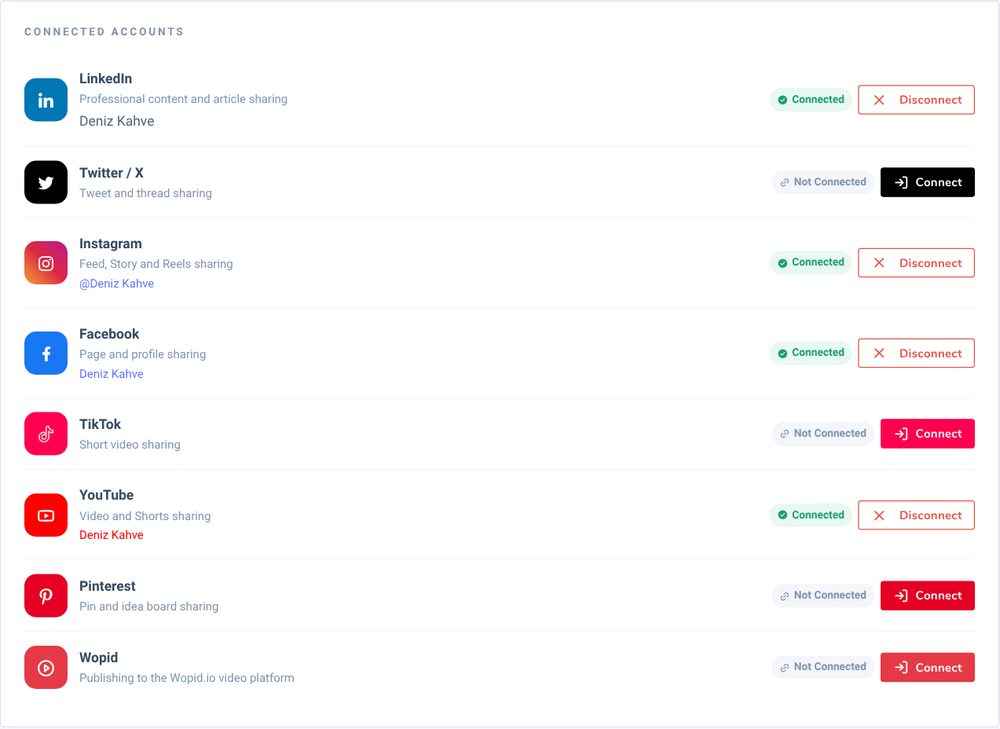
You can connect LinkedIn, Twitter/X, Instagram, Facebook, TikTok, YouTube, Pinterest and Wopid. How many accounts you can connect depends on your plan (Free 1, Pro 5, Business 10). To disconnect, press Disconnect on the same page.
What each platform accepts
| Platform | Post |
|---|---|
| LinkedIn, Facebook | Text, image or video |
| Twitter/X | Text (up to 280 characters; longer text is shortened), image or video |
| An image or video is required | |
| An image is required | |
| YouTube, TikTok, Wopid | A video is required |
5.Creating and publishing posts
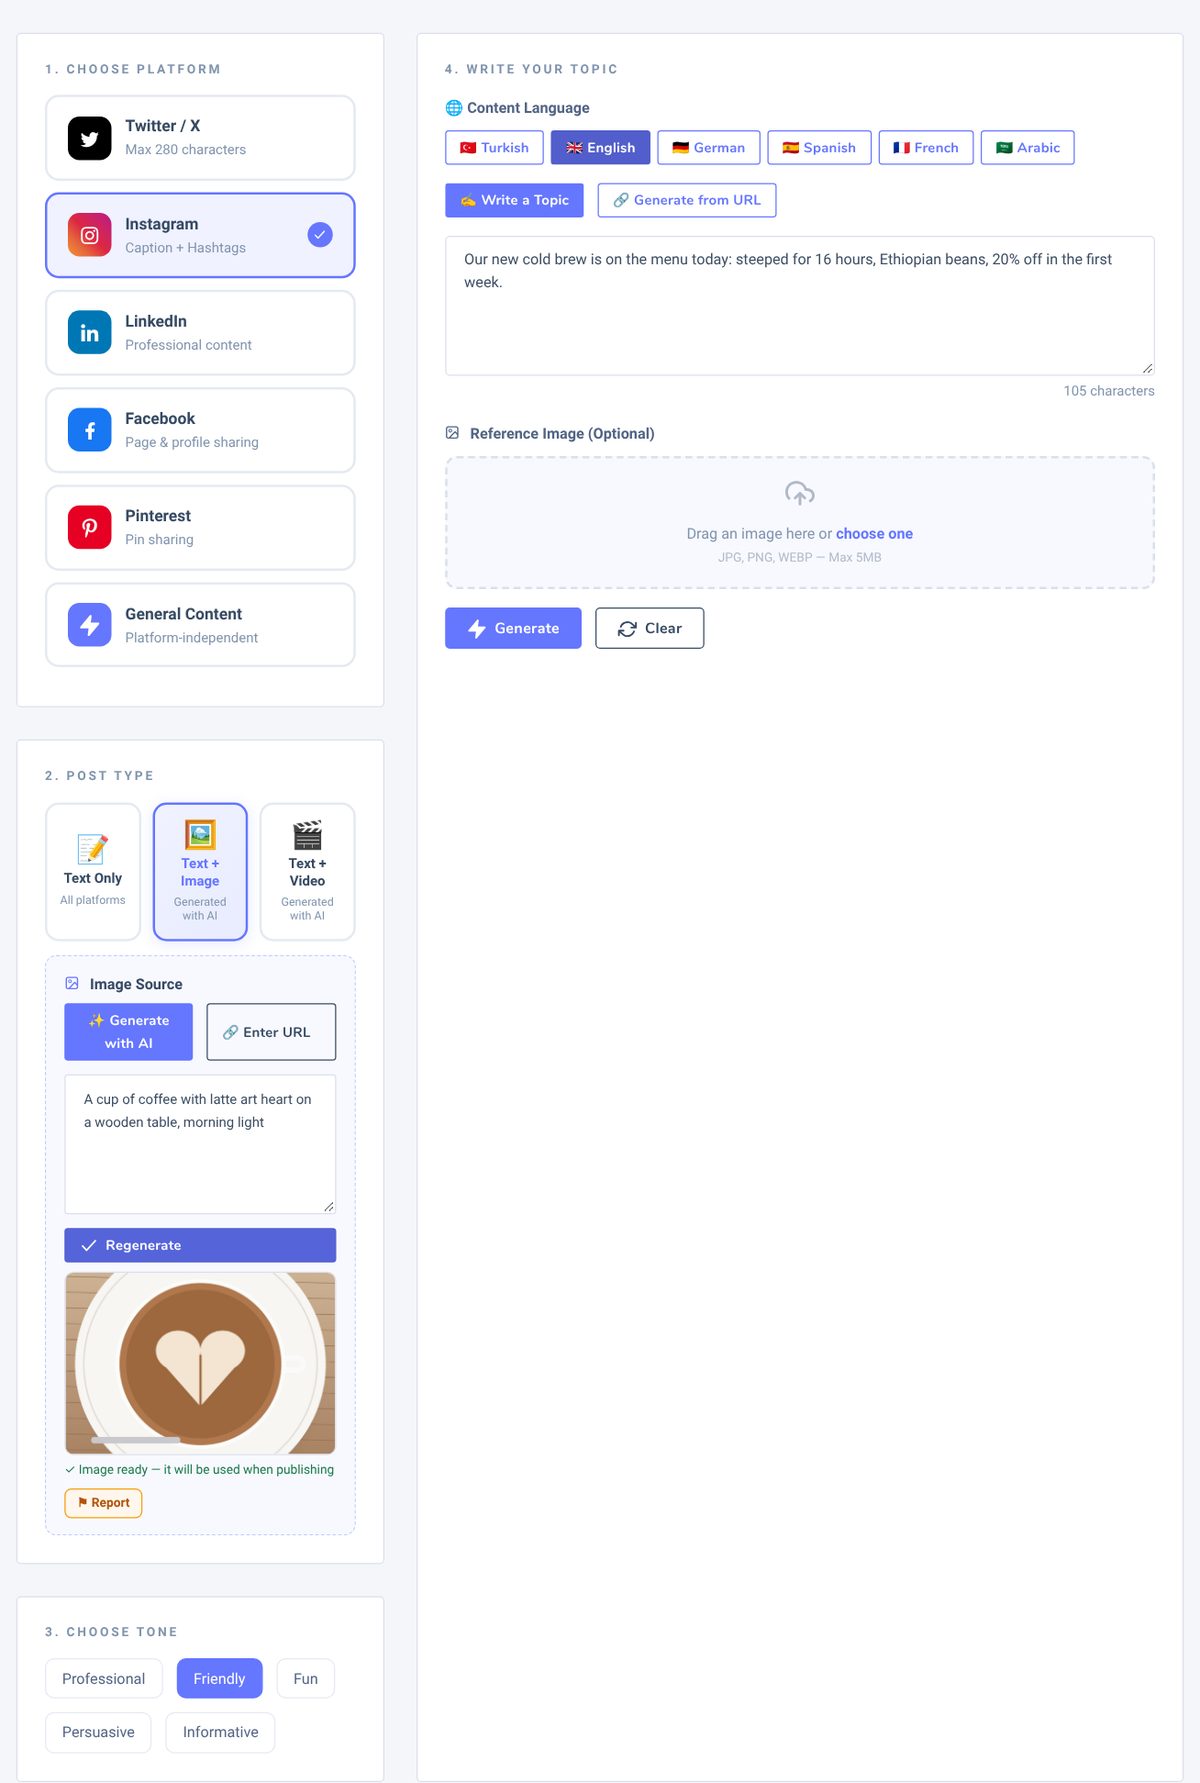
The Create Content page has four steps:
- Choose Platform: Twitter/X, Instagram, LinkedIn, Facebook, Pinterest or General Content. You can choose more than one; the text is written for the length and style of the platform you selected last.
- Post Type: Text Only, Text + Image or Text + Video. For an image, choose Generate with AI, describe the image and press Generate Image, or use Enter URL to paste a public image link. For a video, choose the ratio (9:16, 1:1, 16:9) and length (5 or 10 s) and press Generate Video.
- Choose Tone: Professional, Friendly, Fun, Persuasive or Informative.
- Write Your Topic: Choose the content language (for Arabic, Standard, Gulf or Egyptian dialect), write your topic and press Generate. If you paste a YouTube video, blog post or TikTok link on the Generate from URL tab, the AI summarises it and turns it into a post for the platform.
The generated content
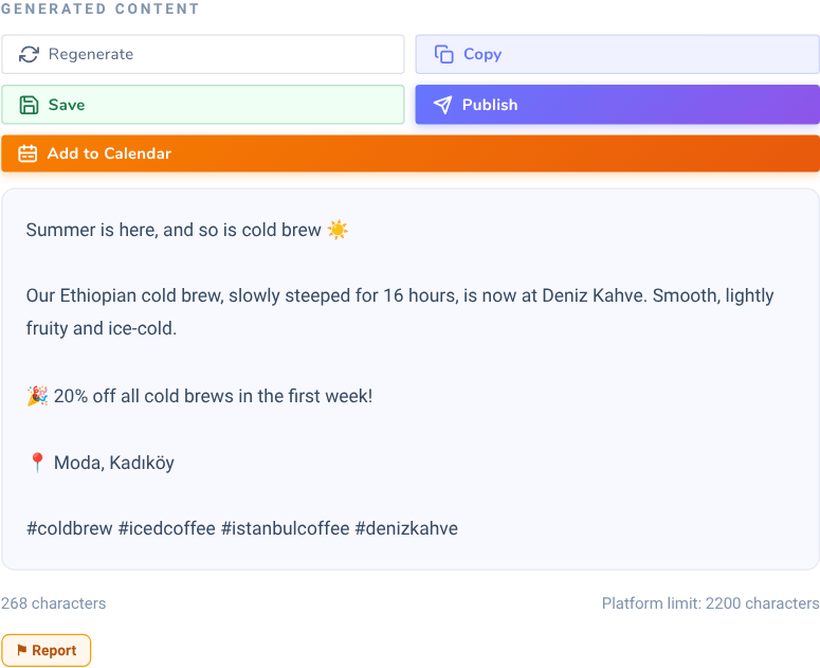
The text arrives in a few seconds, with the character count and the platform limit below it. You can edit the text in the box. The buttons:
- Regenerate: Writes a new text with the same settings (1 content allowance).
- Copy and Save: Copies to the clipboard or saves to Documents.
- Publish: Publishes right away on every platform you selected; the button shows on how many platforms it was published and explains any error.
- Add to Calendar: You choose a date and time, and the post is published automatically on the selected platforms at that time (see Content Calendar).
6.Prompt Library
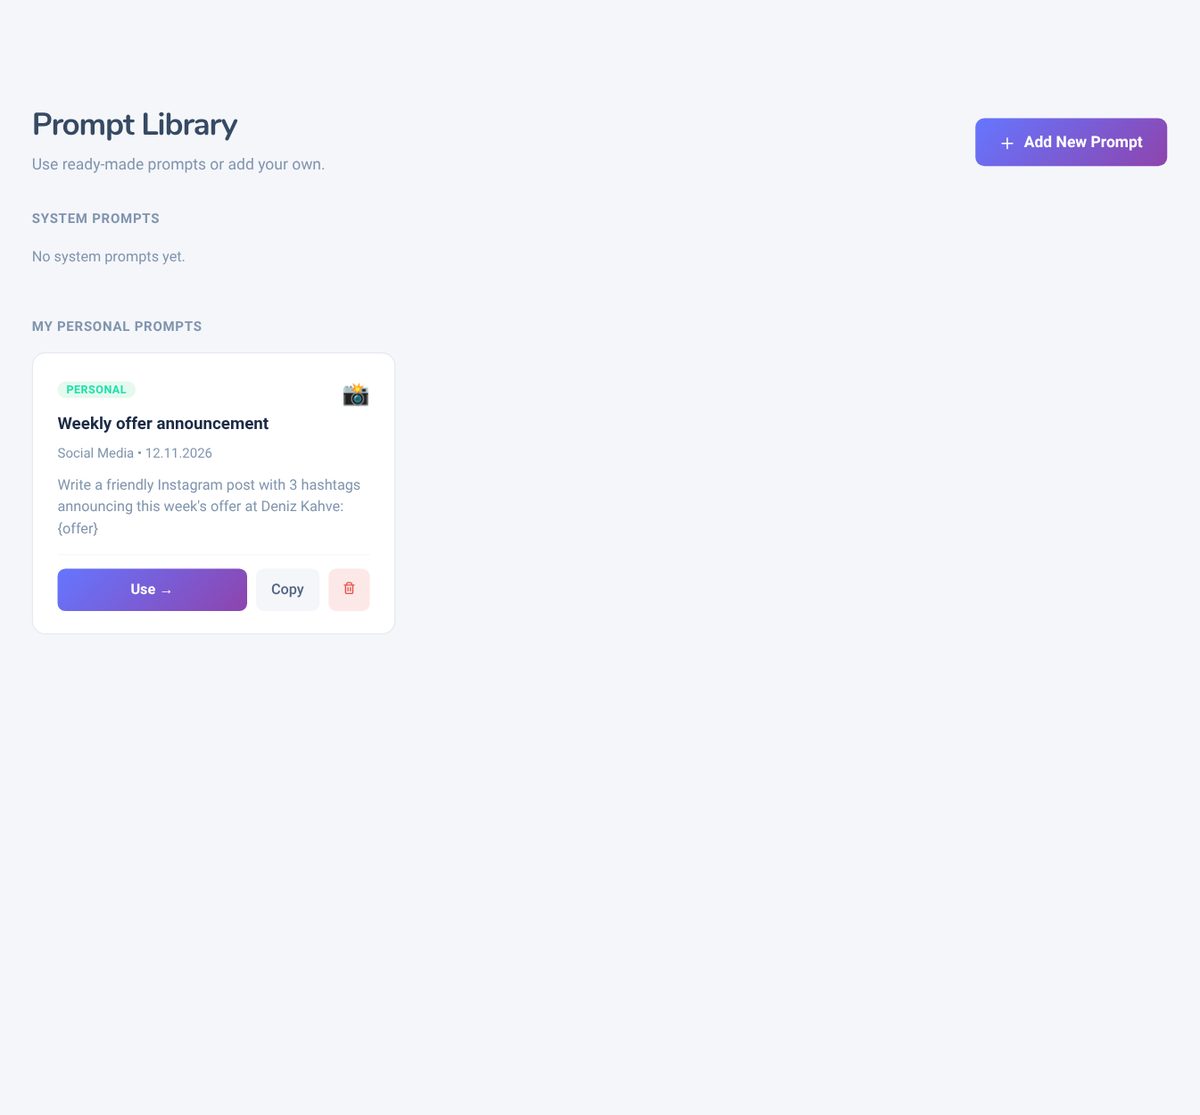
The Prompt Library holds ready-made templates that shape the structure of a post: a viral LinkedIn post, an Instagram caption, short video hook ideas, a content summary and more. Use → takes you to the Create Content page, where the template is applied to your topic; the language and tone still come from your choices on that page. To drop the template, press Remove on Create Content.
With Add New Prompt you can save your own template (title, category, platform and the prompt text). Personal prompts are listed under My Personal Prompts and only you can see them.
7.Video creation
The Generate Video page has two modes: Single Video makes a short one-scene clip; Pipeline Video turns your topic into a 2–5 scene video, with narration if you want. For narrated videos of up to 30 scenes, use the Long Video Studio.
Single video
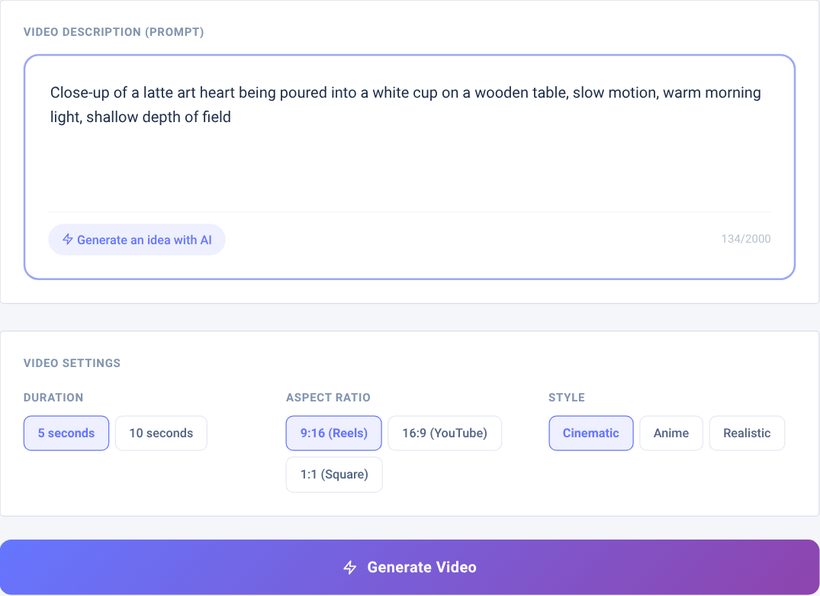
Write a description of the video or press Generate an idea with AI. Choose the length (5 or 10 s), the ratio (9:16 Reels, 16:9 YouTube, 1:1 Square) and the style (Cinematic, Anime, Realistic), then press Generate Video. It usually takes 2–4 minutes; you can leave the page, and the video appears in My Videos when it is ready.
Multi-scene (Pipeline) video
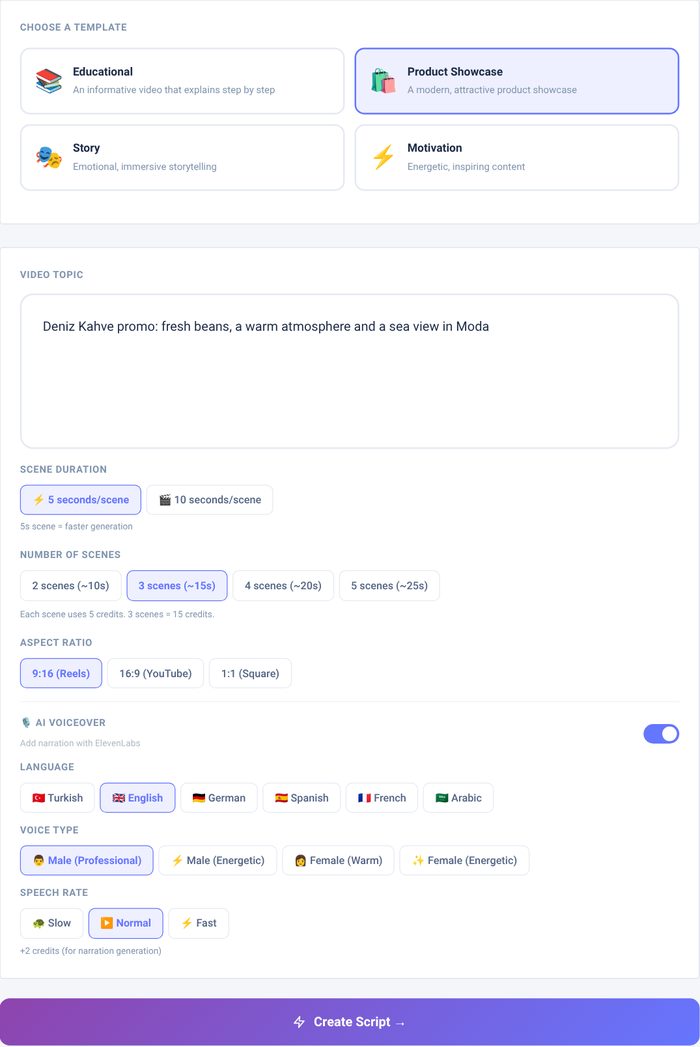
Choose a template (Educational, Product Showcase, Story, Motivation) and write the video topic. Set the scene length (5 or 10 s), the number of scenes (2–5) and the ratio. If you turn on AI Voiceover, you choose the language, voice (two male and two female voices) and speaking speed. Then press Create Script →.
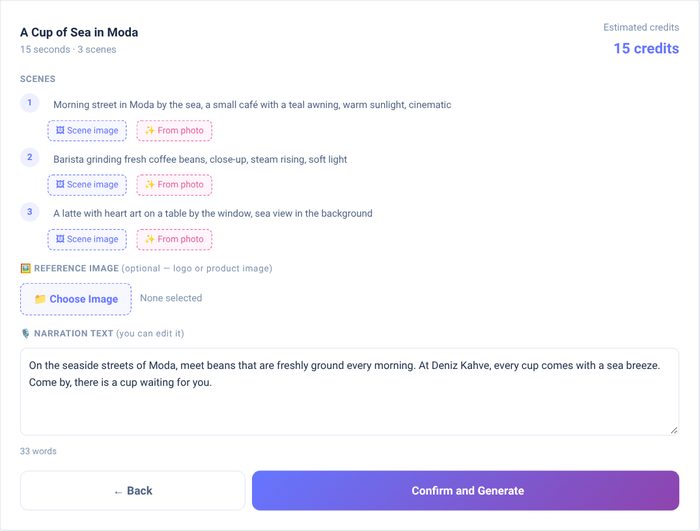
In the script preview you can click a scene's description to edit it and change the narration text; nothing is charged at this step. With Scene image you can add your own image (a logo or product) to a scene and carry it to every scene with Apply to all scenes. From photo creates a scene image that places your own photo in a setting you describe (2 credits). When you are ready, press Confirm and Generate; the estimated credits are shown at the top right.
My Videos
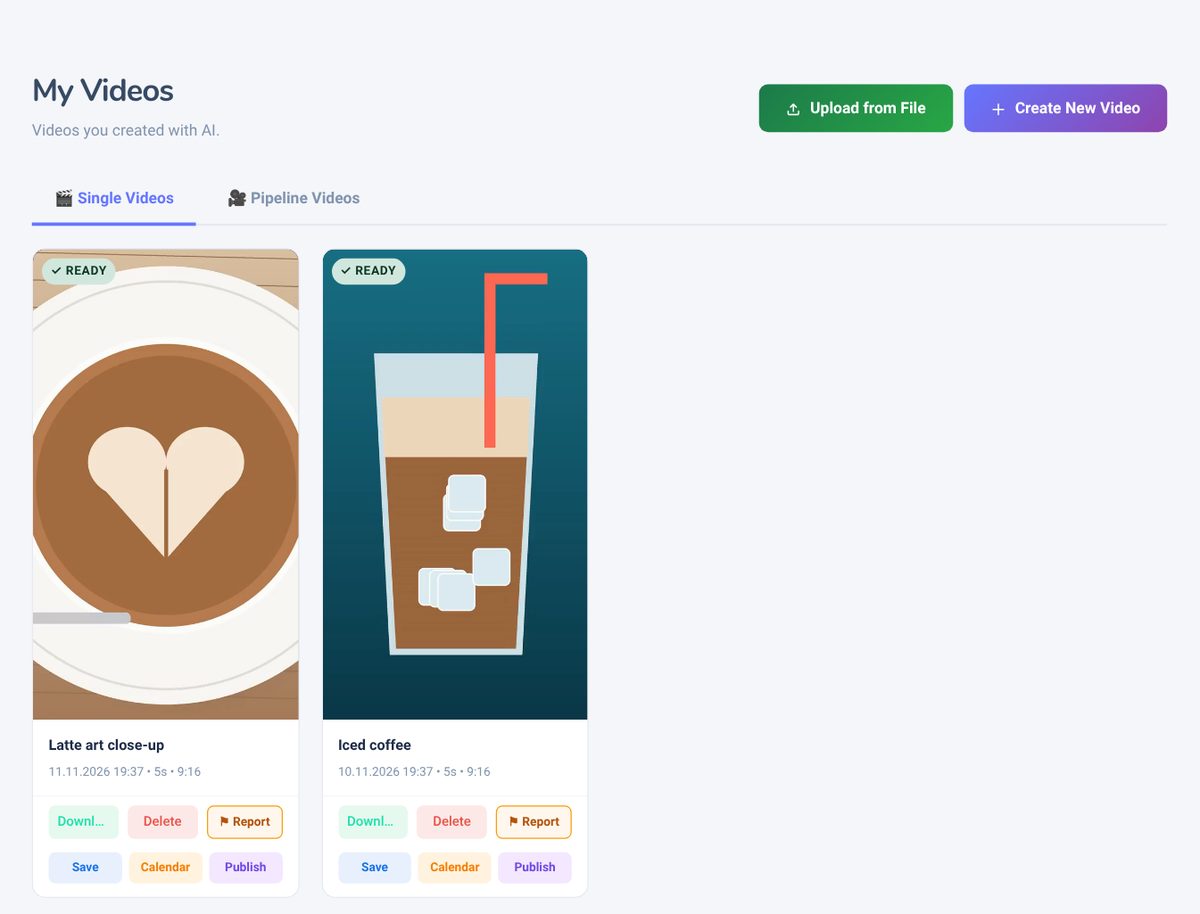
On My Videos, single and pipeline videos are on separate tabs. You can watch each video, Download or delete it, share it on Instagram, TikTok, YouTube, LinkedIn, X, Facebook or Wopid with Publish, or schedule it with Add to Calendar. With Upload from File you can add a video from your computer (MP4, MOV, AVI, WebM, MKV; up to 500 MB) and publish it the same way.
8.Long Video Studio
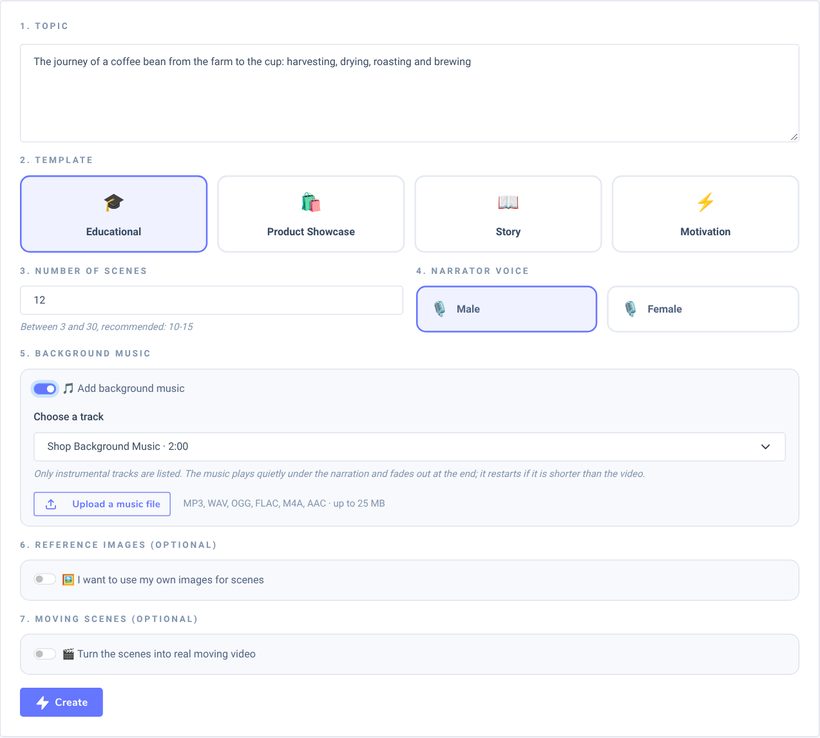
The Long Video page turns your topic into a multi-scene video with narration, images and, if you want, music:
- Write the Topic and choose a Template (Educational, Product Showcase, Story, Motivation).
- Number of Scenes: 3 to 30; 10–15 is recommended. Narrator Voice: Male or Female.
- Background Music: Choose one of the instrumental tracks in My Music, or upload a music file (MP3, WAV, OGG, FLAC, M4A, AAC; up to 25 MB). The music plays quietly under the narration.
- Reference Images (optional): Add up to 3 of your own images per scene, 12 in total; the AI writes the script around your images and creates the scenes you leave empty.
- Moving Scenes (optional): Each scene's image becomes a 10-second moving clip, at an extra charge per scene. A scene that cannot be animated stays as an image and its charge is refunded.
- Press Create. The AI writes the script first, then creates and joins the scenes; this can take a few minutes and you can leave the page. Finished videos are listed under My Past Videos on the same page.
9.Music and clips
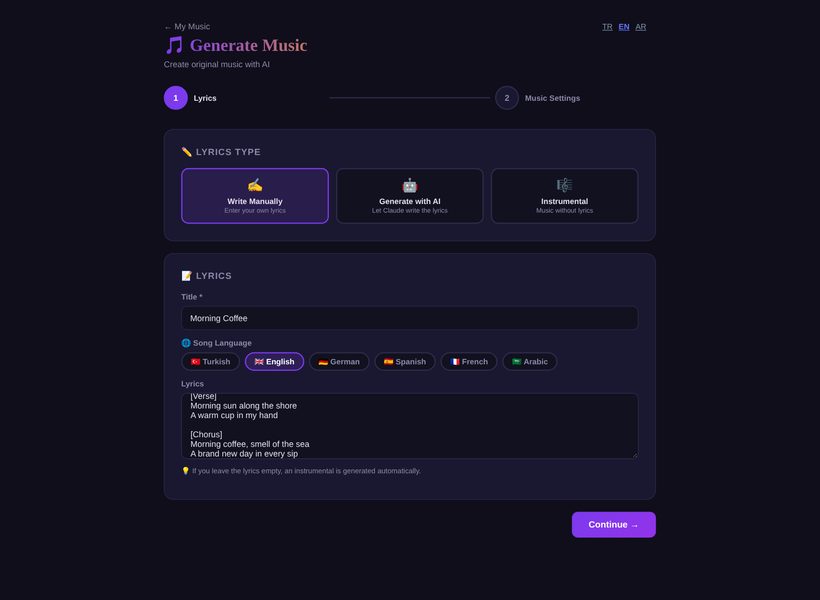
Generate Music has two steps. First you choose the lyrics type: Write Manually (your own lyrics), Generate with AI (give a topic, mood and genre and press Generate Lyrics; 1 content allowance) or Instrumental. Set the song title and language (Turkish, English, German, Spanish, French, Arabic) and press Continue →. If you leave the lyrics empty, an instrumental track is created.
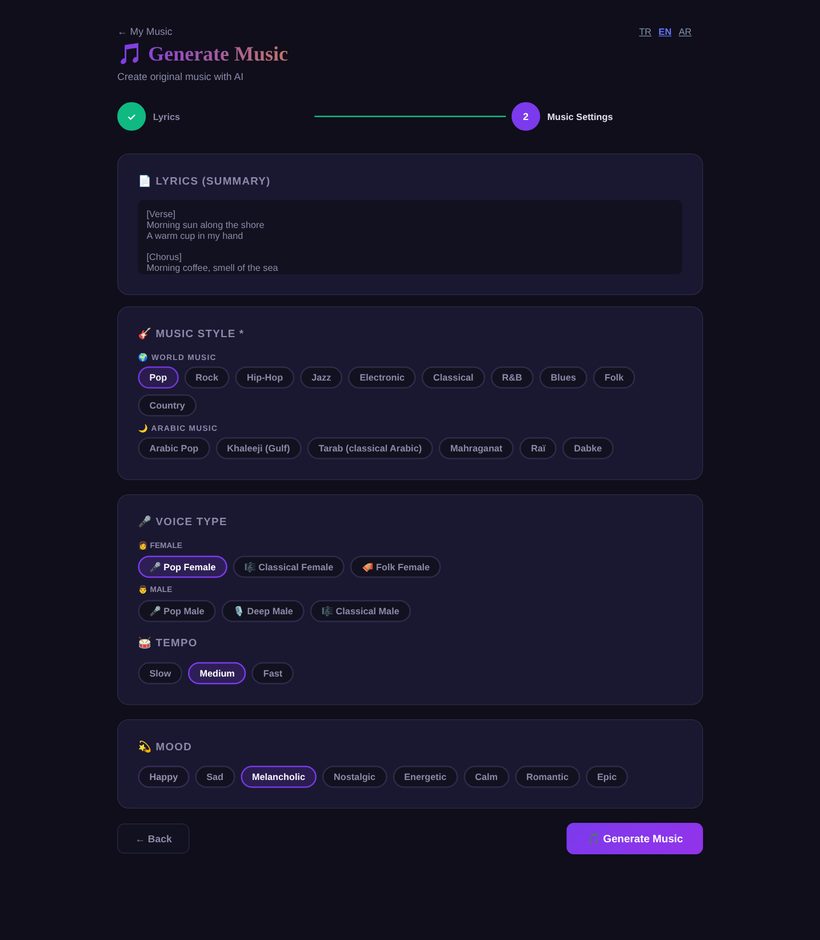
In the second step, choose the genre (Turkish, world and Arabic styles), the voice type, the tempo and the mood, then press Generate Music. The music is usually ready in 1–2 minutes and appears in My Music.
My Music and clips
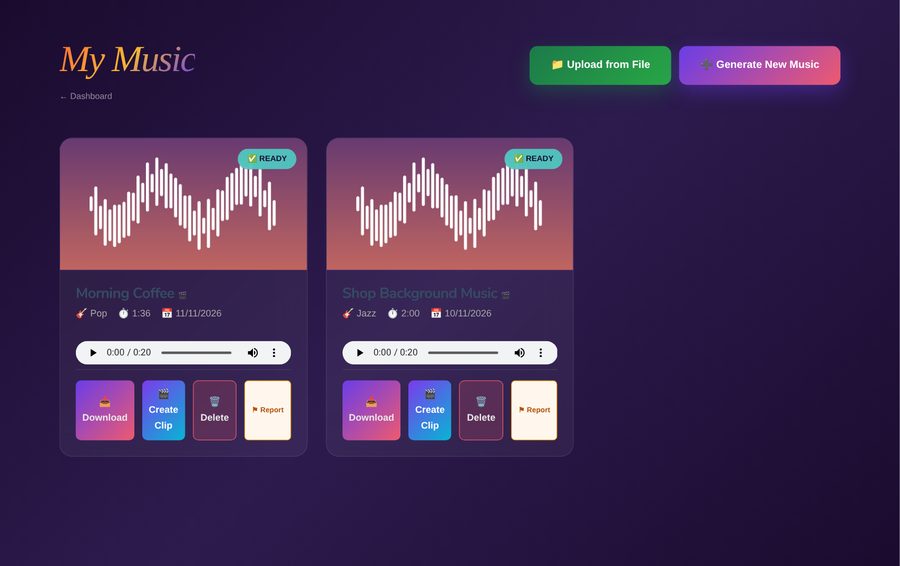
On My Music you can listen to, download, delete and share each track. Upload from File adds your own music file (MP3, WAV, OGG, FLAC, M4A, AAC; up to 100 MB). 🎬 Create Clip makes a video from your music: a Simple clip uses the cover image on a coloured background and is ready in about 1 minute; Cinematic AI creates a 6-scene video (about 2–4 minutes). The clip page, opened by clicking the track title, also offers a Lyrics Video with the lyrics scrolling on screen, a Sound Wave that moves with the music, the video format (9:16, 16:9, 1:1) and the background theme.
For clip charges, see the table in Plans, allowances and credits.
10.Carousel
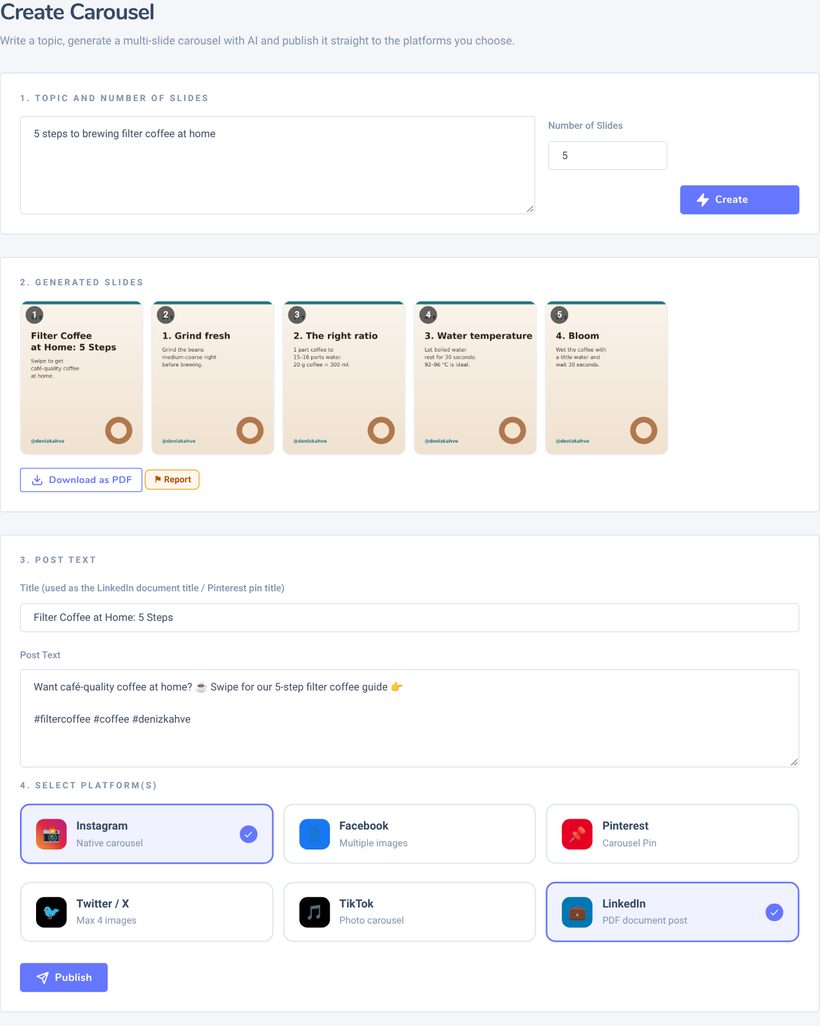
On Create Carousel, write your topic, choose the number of slides (3–10) and press Create. When the slides are ready they appear as thumbnails; you can save them with Download as PDF.
To share, write the post text and the title (the title becomes the document title on LinkedIn and the pin title on Pinterest), choose the platforms and press Publish. The carousel is shared in the format each platform supports: a real carousel on Instagram, multiple images on Facebook, a carousel pin on Pinterest, a photo carousel on TikTok, a PDF document post on LinkedIn, and up to 4 images on Twitter/X.
11.Content Calendar and automatic publishing
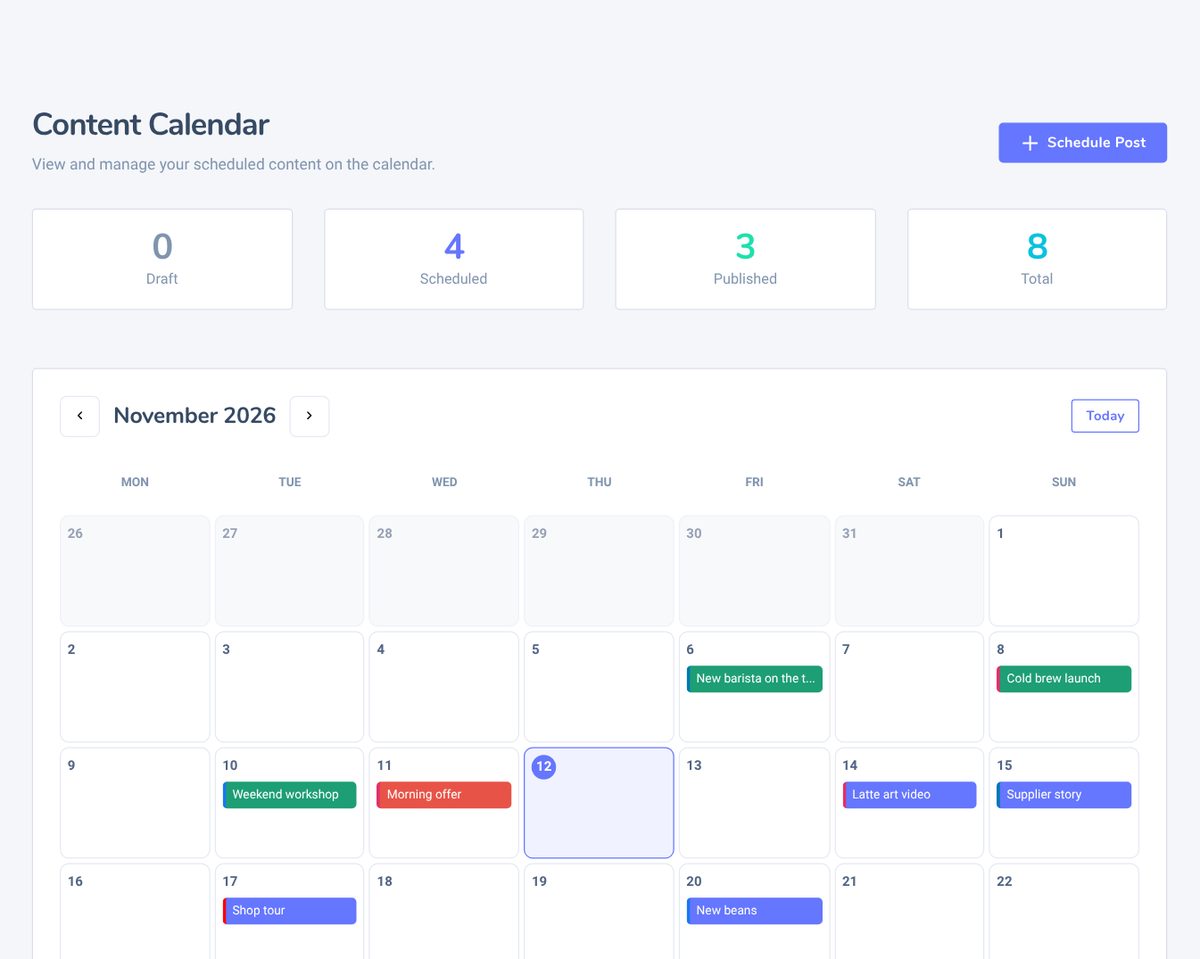
The Content Calendar shows your scheduled posts in a month view; the boxes at the top count drafts, scheduled and published posts. Click a post to see its content, platform and any error message.
Scheduling a post
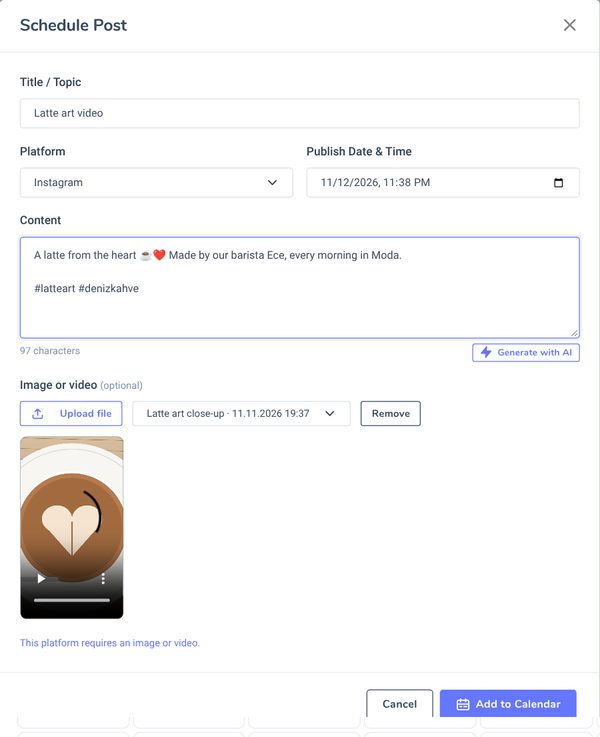
Press Schedule Post and enter the title, platform, and publishing date and time. Write the content yourself or press Generate with AI. If needed, add an image or video with Upload file or pick one of your videos from the list, then press Add to Calendar. The window shows below what media the selected platform needs.
Posts are published automatically on your connected account when their time comes. The system checks scheduled posts every 5 minutes, so a post goes out within a few minutes after the scheduled time. Automatic publishing works on all 8 platforms; the account must be connected at publishing time.
12.Published and failed posts
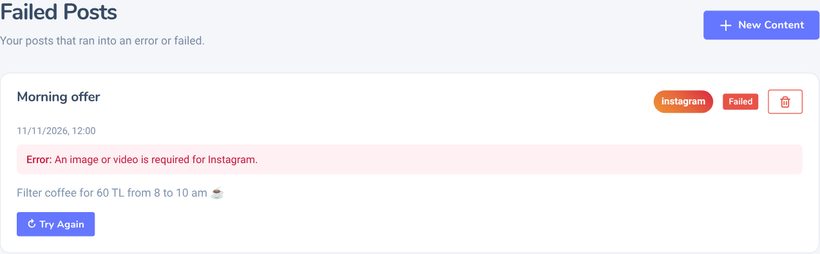
Published Posts lists what was shared successfully and Failed Posts lists what could not be published. Each failed post shows the reason for the error. After fixing it (reconnecting the account, adding the missing image and so on), press Try Again.
The most common reasons: the account is not connected or its connection has expired, there is no image or video for Instagram, no image for Pinterest, or no video for YouTube, TikTok or Wopid.
13.Documents and History
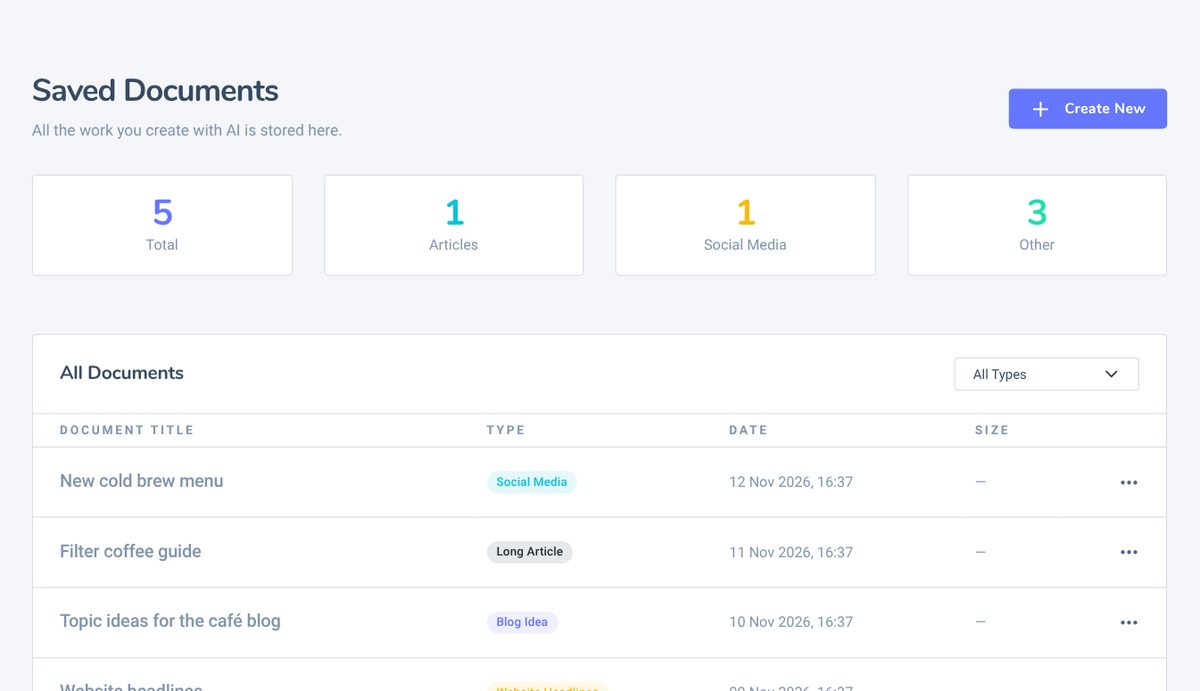
Texts you keep with Save are listed on the Documents page by type (Long Article, Social Media, Blog Idea, Website Headlines, YouTube Tags). From the menu at the end of each row you can view, copy or delete a text. History shows the same records in date order. Your videos are in My Videos and your music in My Music. Your content is kept until you delete it.
14.API keys
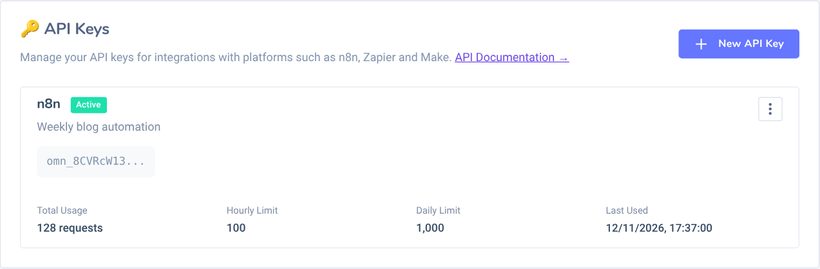
To connect Ommini to automation tools such as n8n, Zapier or Make, press New API Key on the Settings → API Keys tab and enter a name, a description and hourly/daily request limits. For security, the key is shown only once, when it is created; copy it right away and keep it somewhere safe. The API is not available on the Free plan; you can create 5 keys on Pro and 10 on Business. Every endpoint is described on the API Documentation page.
15.Ommini Real Estate and Ommini Auto
Ommini Real Estate is a listing panel for real estate agents, and Ommini Auto is one for car dealers and sellers. You enter the listing details, photos and documents; Ommini writes the listing texts with AI, prepares a listing video and opens a shareable listing page in three languages. Both work with the same Ommini account and appear in the left menu as Ommini Real Estate and Ommini Auto.
Getting started
- If you already have an account: Just click Ommini Real Estate or Ommini Auto in the menu. If most of your work is preparing listings, choose that panel under Settings → Profile → My Panel and press Save; My Listings then opens straight after login and the panel's menu moves to the top. The social media tools stay available whatever you choose.
- If you are opening a new account: Sign up at ommini.com/en/login.html?sektor=emlak or ommini.com/en/login.html?sektor=arac and verify your email. The account opens with that panel selected.
- Fill in your profile first: Use the Agent Profile button (Dealer Profile in Ommini Auto) at the top right of My Listings to enter your company name, logo, photo, phone and WhatsApp details. They appear in the "Listed by" box on your listing pages and on the last frame of the listing video.
- Create a listing: Use New Listing to enter the details and photos, then press Complete Listing; your listing page and listing texts are ready.
Listing allowance
The listing panels have a monthly listing allowance that is separate from your plan's content and video allowances: Free 1 (email must be verified), Pro 5, Business 50 listings. Ommini Real Estate and Ommini Auto each have their own allowance. The allowance is used the first time a listing is completed. Listing texts and the listing video (5 per listing a month) are included in the listing allowance at no extra charge.
Each panel has its own guide
Both panels have their own guide that explains every screen step by step: the Ommini Real Estate User Guide and the Ommini Auto User Guide. Inside a panel you can also open them with the Guide button at the top right of My Listings or with User Guide in the left menu.
16.Frequently asked questions
Why are the screen language and the content language different?
TR · EN · AR at the top right only translates the screens. The language the AI writes in is the Content Generation Language in Settings; the language buttons on Create Content and Create Video change it too. For music, the song language is chosen separately.
A post failed. What should I do?
Read the reason on the Failed Posts page. If the account is not connected or its connection has expired, reconnect it on Social Accounts; if the platform needs an image or video, add one. Then press Try Again.
My scheduled post did not go out exactly on time.
Scheduled posts are checked every 5 minutes, so it is normal for a post to go out a few minutes after the scheduled time. If it never went out, check the Failed Posts page.
Video creation is taking a long time.
A single video usually takes 2–4 minutes; multi-scene and long videos take longer. You can close the page; the video appears in My Videos (long videos on the Long Video page) when it is ready. If creation fails, the allowance or credits used are given back.
My monthly allowance ran out. What happens?
Creation continues from your credits, if you have any. If you have no credits either, you can buy a credit pack or upgrade your plan on the Subscription page. Monthly allowances renew at the start of each month.
If I delete a track, do I get the allowance back?
No. The music allowance is used when creation starts and does not come back when you delete the track. If creation fails, the allowance is given back.
How do I end my subscription?
A plan bought on the web ends by itself after 30 days and the account returns to the Free plan, so there is nothing to cancel. If you bought it in the mobile app, cancel the subscription in the App Store or Google Play.
How do I delete my account?
Use Delete Account at the bottom of the Settings → Profile tab and enter your password. All your data, including your content, videos and music, is deleted permanently. If you have an active subscription from the mobile app, cancel it in the App Store or Google Play first.
Something I generated is inappropriate or wrong.
Report it with the ⚑ Report button next to texts, images, videos and music. You can also correct the text in the box or generate it again.
If you have another question, write to us from the support bubble at the bottom right of the panel.